Here’s how I configured my WordPress server to handle huge traffic spikes. It’s easier than you think.
For those who have seen smoke coming from your server in the garage, you know.

But for those who haven’t, here’s a bit of history as I remember it:
In the 1990s Slashdot used to link to interesting websites and blogs. If you wrote about using Linux as a NAT router for your entire University, assembled a huge aircraft carrier out of Legos, built a nuclear reactor in your basement, or made a roller coaster in your backyard; you’d end up on Slashdot.
Slashdotted. The problem is Slashdot became so popular and drove so much traffic to small websites, it started crashing sites just by linking to them! It was similar to a denial of service (DoS) attack. This is the “Slashdot Effect“.
Twenty years later, a number of sites have been known to generate enough traffic to take a site down. Drudge Report, Reddit, Twitter, etc. This is notoriously known as the “Internet Hug of Death“.
There are plenty of hosting providers that will charge $2,000/month to handle this kind of load. But I’m a bit thrifty; it’s simple and inexpensive to engineer for this kind of traffic.
Here are the four steps I took to handle traffic spikes:
Step 1. Get a fast physical server

Although, I think step 4 would let you get away with a Pi, it doesn’t hurt to have a fast server. I have this site configured in a VM with 4-cores on a modern Xeon CPU and 8GB memory, which seems to be plenty, if not overkill. The physical host has 28 cores and 512GB memory, so I can vertically scale quite a bit if needed. Very little traffic actually hits the server because I use Cloudflare, but I like it to be able to handle the traffic just in case Cloudflare has problems. I run the server on Ubuntu 20.04 LTS under Proxmox.
Step 2. Use an efficient web server
I learned the hard way that Apache runs out of CPU and memory when handling large concurrent loads. NGINX or OpenLiteSpeed are much better at serving a large number of simultaneous requests. I use OpenLiteSpeed, because it integrates well with the LiteSpeed Cache WordPress plugin. I believe LiteSpeed Cache is the most comprehensive WordPress caching system that doesn’t cost a dime.
Step 3. Page caching.
Use a page cache like WP-Rocket, FlyingPress, or if you’re cheap like me, LiteSpeed Cache to reduce load. This turns dynamic pages generated from PHP into pre-generated static pages ready to be served.
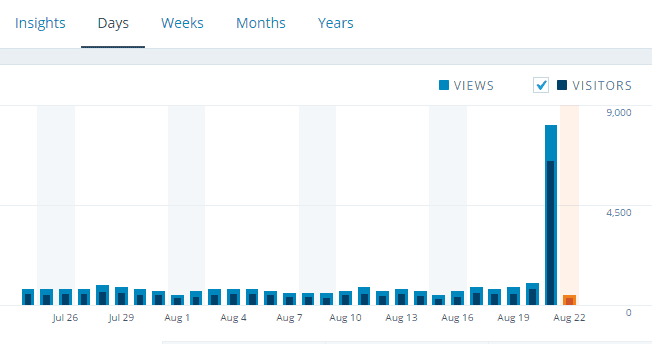
Now, just these three steps are enough to handle a front-page hit on Reddit, Slashdot, Twitter or Hacker News. Some sites can generate around 200 visitors per second (or 120,000 visitors per minute at peak). But it’s better to overbuild than regret it later which brings us to step 4…
A general rule of thumb is to overengineer websites by 100x.
Step 4. Edge Caching
A final layer to ensure survival is to use a proxy CDN such as Cloudflare, QUIC.cloud, or BunnyCDN. Those take the load off your origin server and serve cached dynamic content from edge locations. I use Cloudflare. Cloudflare has so many locations you’re within 50ms of most of the population–this site gets cached at these locations:

I configured Cloudflare to do Page Caching, and use Cache Rules instead of Page Rules following the CF Cache Rules Implementation Guide (I don’t user Cloudflare Super Cache, but their guide works fantastic with LiteSpeed Cache). This allows you to cache dynamic content while making sure not to cache data for logged-in users.
A Warning about CDNs — so I’ve tried to use CDNs to optimize and host images in the past, but CDNs seem to have problems delivering images under heavy load. So I host images myself and use ShortPixel’s Optimizer to pre-generate and store multiple optimized copies of each image. This seems more reliable for my scenario. Cloudflare still caches images but not generated on the fly.
Reserve Caching. I enabled an additional layer, CF Reserve Caching, which saves items evicted from the cache into R2 Storage as a layer 3 cache. This is pretty inexpensive, my monthly bill ends up being a little over $5 for this service, but it takes a huge load off my origin server.
As a result, I see a 95% cache hit ratio. And if it misses, it’s just going to hit the LiteSpeed cache, and if that misses, Memcached–so there’s minimal load on the server.
There are actually quite a number of caching layers in play here:
- The Browser cache (if the visitor has recently been to my site)
- Cloudflare T2 – nearest POP (Point of Presence) location to visitor
- Cloudflare T1 – nearest POP (Point of Presence) location to my server
- Cloudflare R2 – Reserve cache
- LS Cache – LiteSpeed cache on my server
- Memcached – Memcached (for database queries)
- ZFS L2 ARC – Level 2 Cache on SSDs on my server
- ZFS ARC – Level 1 Cache in memory on my server
If all those caching layers are empty, it goes to spinning rust.
Browser --> CF T2 --> CF T1 --> CF R2 --> origin --> LSCache --> Memcached --> ZFS L2ARC --> ZFS ARC --> spinning rust.Load Testing
loader.io lets you test a website with a load of 10,000 clients per second. I tested my setup, you can see the load was handled gracefully with a 15ms response time.
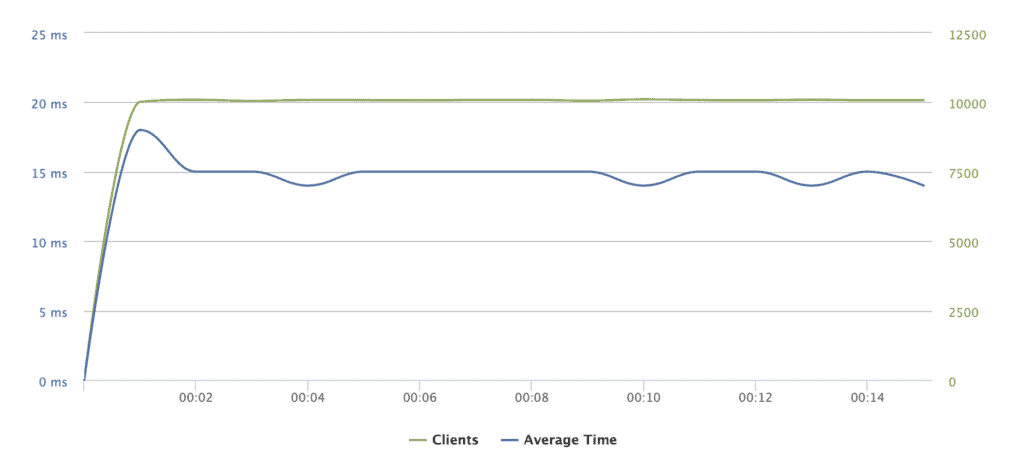
The egress rate is 10.93Gbps (ten times faster than my fiber connection).
I could probably optimize it a little more, but this already qualifies for 100x overengineered, and we’re way past the 80/20 rule. Good enough.
To handle a hug of death, you’ll want:
- Beefy Hardware
- Modern Webserver
- Page Caching
- Edge Caching
Ecclesiastes 1:7 ESV –
All streams run to the sea,
but the sea is not full;
to the place where the streams flow,
there they flow again.