AMD’s new EPYC 3201 is a good processor for a near-silent server …without sacrificing performance.
I saw good price on an open box Supermicro M11SDV-8C-LN4F. It includes an embedded AMD EPYC 3201 8-core processor (Update: 2023-03-21: the 3201 is no longer available, I’ve updated the post and links to point at the newer 3251). I’ve been wanting to try an AMD build for awhile so I grabbed it. This CPU was favorably benchmarked by ServeTheHome matching performance of several Xeon CPUs with a much higher 60-80W TDP. The EPYC 3201 performs just as well (and better in some cases) …but at only 30W TDP.
I don’t really care about power usage. 30W vs 80W might cost me a dollar or two more per year in electricity. But that lower heat makes a difference in cooling requirements. And to me that means less fan noise. You can build a near-silent server with an EPYC 3201 without having to get into anything fancy like liquid cooling.
The last time I had an AMD computer–was 6 years ago. They’ve really been behind Intel in performance for awhile but in the last few years I’ve seen some much better CPUs out of them and thought I’d give it a try.
This an update to my Datacenter in a Box Post which is based on the X10SDV Xeon-D Platform.
I’m planning to use this server in my homelab to expand my Proxmox Virtual Environment from 1 to 2 servers, making them into a cluster.
AMD EPYC Server Build Parts List
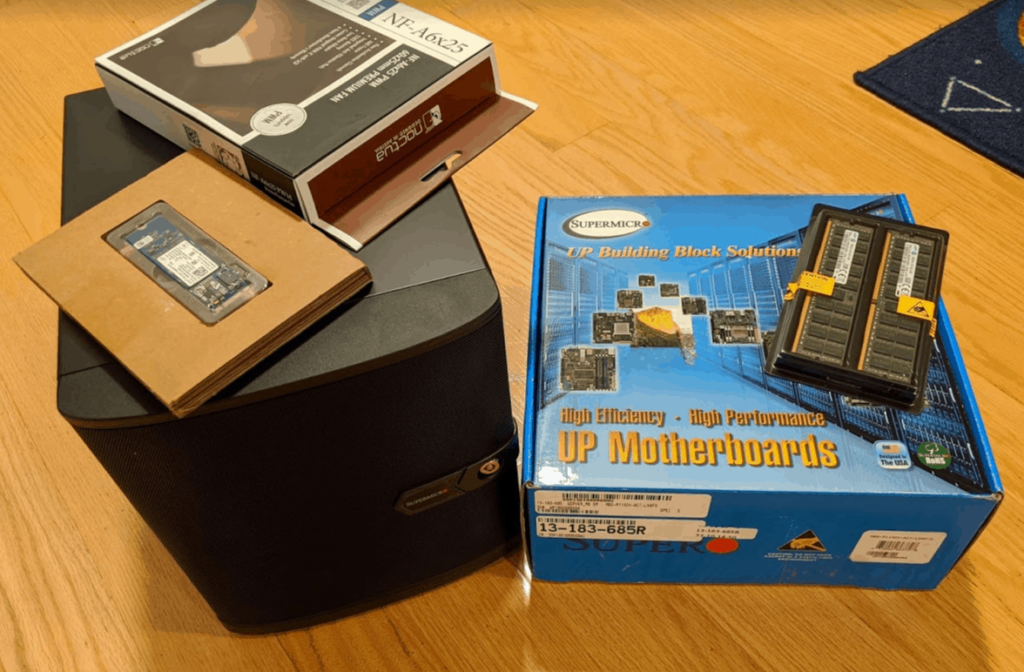
- SuperChassis 721TQ-250B. (Amazon) This is my go-to Mini-ITX chassis—every server I build is based on this case. Small compact, includes 4-hotswap drive bays. For my house I prefer these cases over racks because the fan is a large diameter so it can get a lot of airflow without making much noise. Even iXSystems uses this case for their small FreeNAS units.
- Supermicro M11SDV-8C+-LN4F (Amazon) Motherboard. This includes an AMD EPYC 3251 8-core processor. 4 SATA ports, and Quad gigabit NICs.
- Samsung DDR4 Registered ECC Memory 32GB (2 x 16GB)
- Intel Optane M10 16GB (Amazon) in the NVMe slot. These are cheap (sometimes less than $15 pre-owned) and will be used as a ZIL for ZFS write caching. In an application where every write requires a sync (VMware and NFS) I might spend a little more, but for Proxmox this will be fine.
- Noctua NF-A6x25 PWM (Amazon) – a little extra air flow over the CPU. This fan is not needed if you buy an M11SDV-8C+LN4F. It will be needed if you buy an M11SDV-8C+LN4F.
- 4 x HDDs. I used some extra drives I had lying around, but if buying new I would suggest the Western Digital Red Pros. See my Hard Drives for ZFS Post
How to assemble AMD EPYC Server
Assemble all the parts for a Supermicro AMD EPYC Microserver Build. This is a simple build. In fact, Eli did most of it—I just supervised.
Total Time: 1 hour and 45 minutes
Remove cover from case
4 thumb screws at the back, then push the blue tab to release.
Remove the motherboard tray from the chassis.
5 Screws in the back secure it.
So, Step 3 is here to tell you we forgot the backplate, so complete Step 8, then Proceed to Step 4.
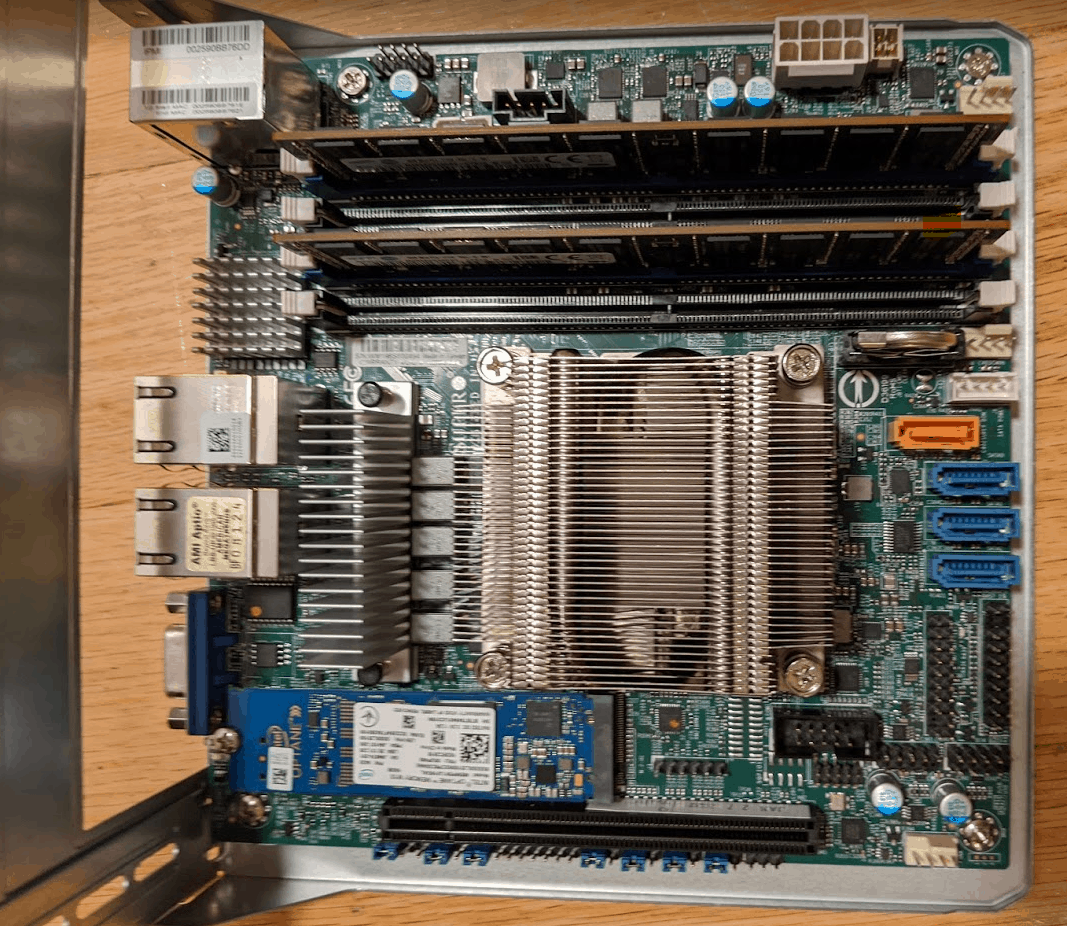
Install Motherboard onto the tray
Line up the motherboard with the 4 posts, and screw it in. A little bag of screws titled “MB” should have come with the chassis.
Install Memory
If using 1 stick of RAM populate the closest blue slot.
If using 2 sticks of RAM (which is what I will be doing) populate the 2 blue slots.

Install NVMe drive
(Yellow arrow above). Now the board should look like this:
Slide Tray into case… Oh no! We forgot the backplate!
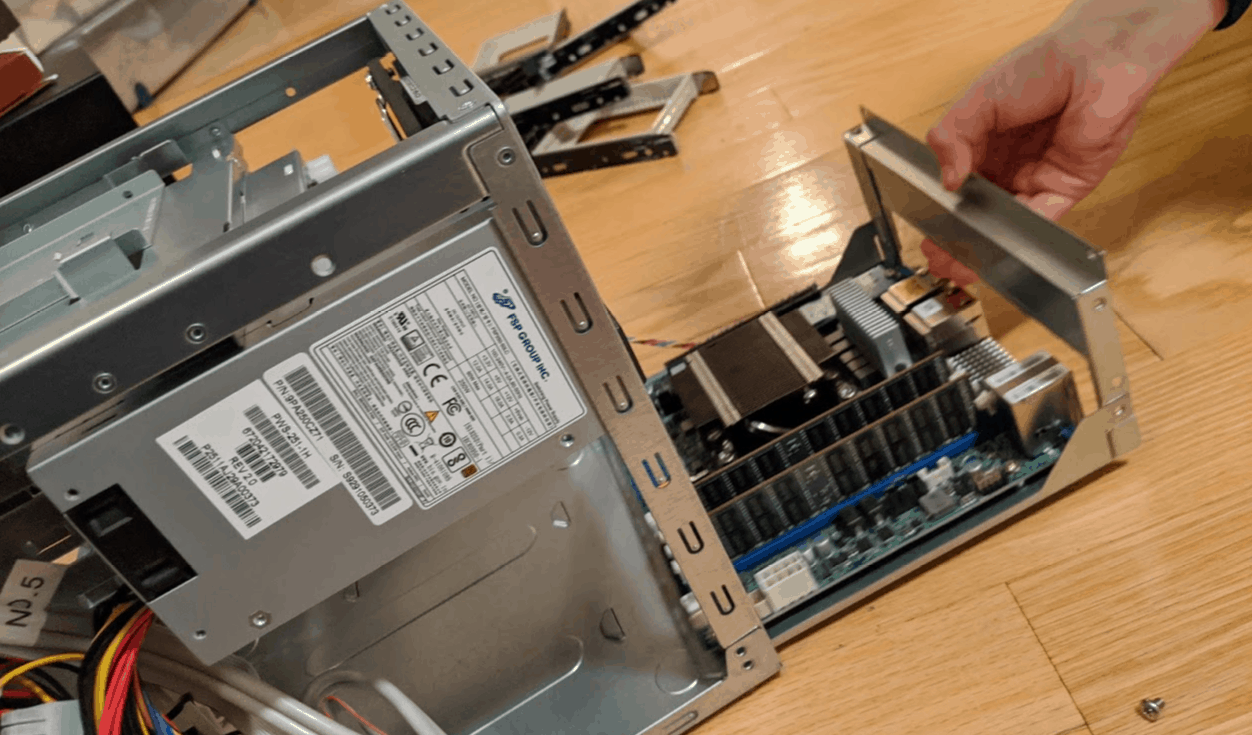
Install the Backplate…
Take the motherboard back out of the case, unscrew it from the 4 posts, install the backplate (easiest to snap it into the back of the tray). Install the motherboard again, and slide …actually, leave it out, because step 9 is easier with it out.
Remove the Front Cover
(So, this step is not needed unless you need more airflow over the PCI area, we ended up doing step 20, 21, & 22 instead).
You’ll find it secured by 4 black tabs like these…
Install the Noctua Fan
(Again, you’ll probably want to follow steps 20, 21, and 22 instead)
The AMD CPU uses a “passive” heatsink, even though it’s low TDP it still needs some air. Take the 4 rubber feet and pull them through the holes from the front of the case.
Then pull them through the holes on the fan. Make sure the arrows on the fan are pointing towards the CPU. Now you can slide the motherboard in and put the front cover back on.
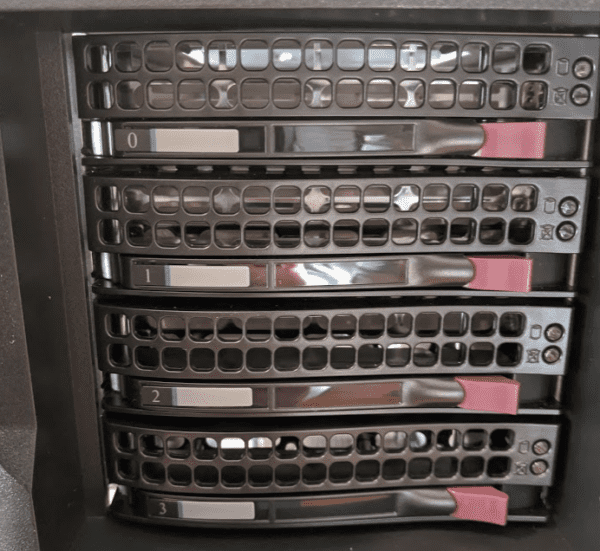
Label the hard drive trays
Always start at 0. So label them with the 0, 1, 2, & 3 stickers. Burn the sticker for 4. You don’t need it. Don’t label the drives 1, 2, 3, 4. You’ll know why when a drive fails and you need to locate it.
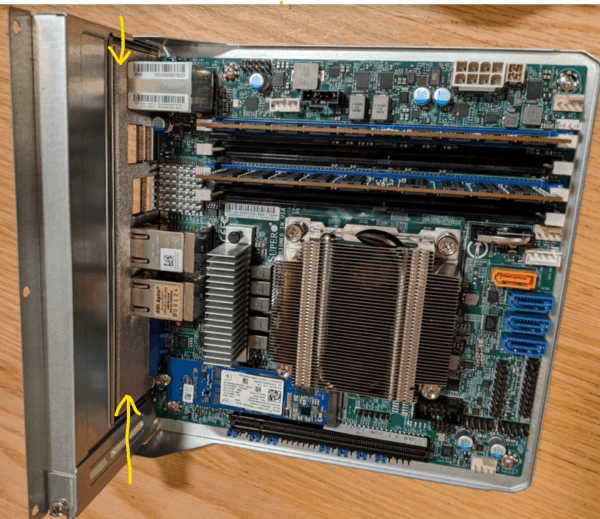
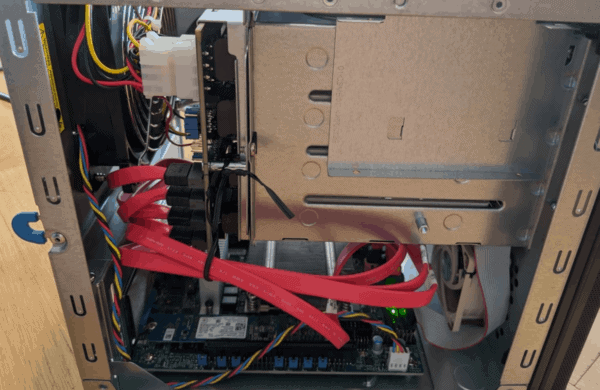
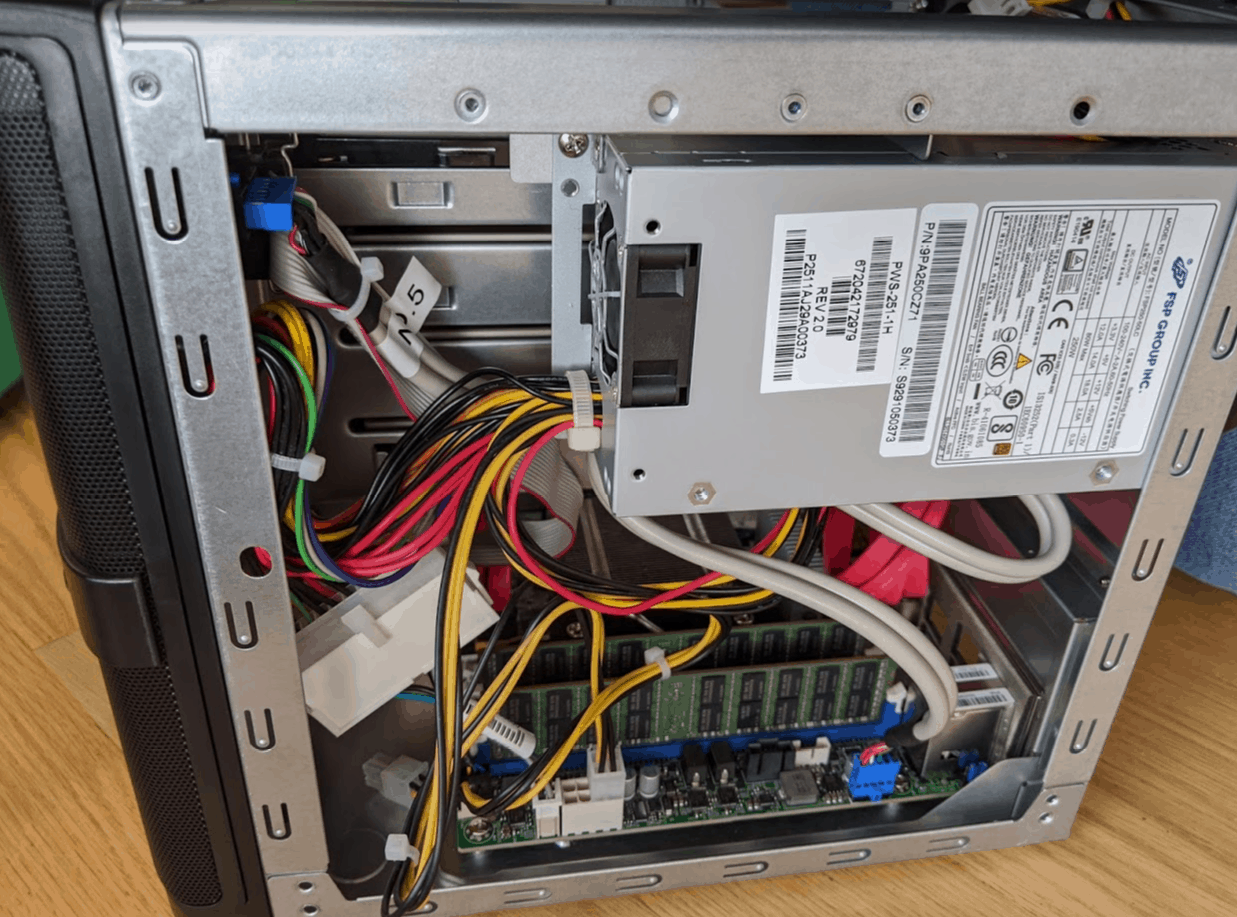
Plug in the case fan (black, yellow, red, blue wire) to the FANA port and SATA cables (red) between the motherboard and backplate.
I should note that when plugging in the SATA cables use the reference on the backplate and match it with the port numbers on the motherboard. SATA port 0 on the motherboard should plug into port 0 on the backplate and so on. Don’t mix them up or you’ll have a hard time locating a failed drive.
Plug in everything else.
Just plug in all the wires. Noctua Fan, DC Power, AC power, USB Header (blue).
Power Test
At this point I plug it in to power to make sure things come up.
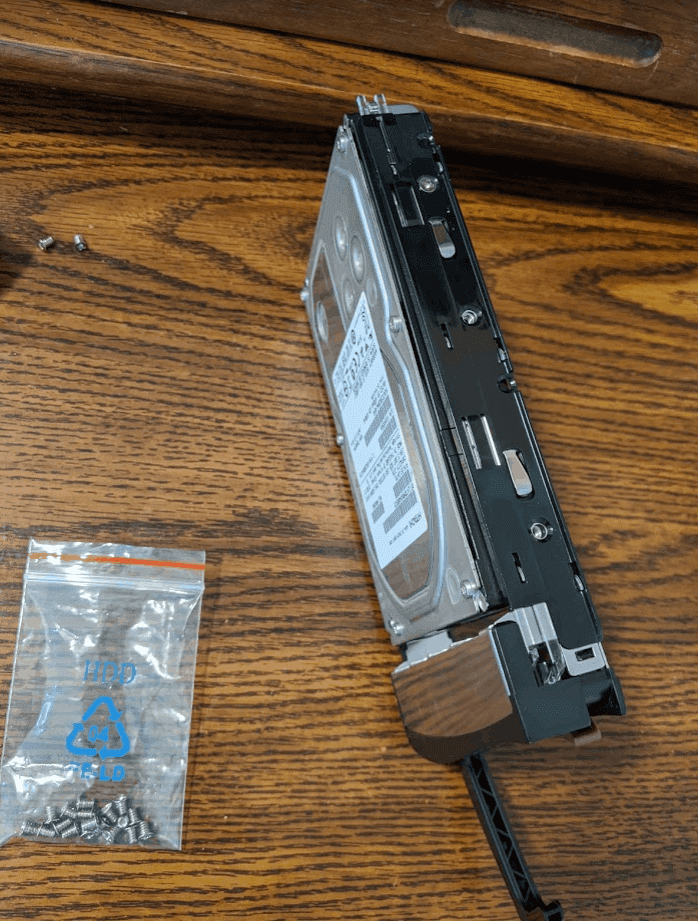
Install Hard Drives
Use the HDD screws that came with the case. Install 4 screws per drive. Then slide them into the bay.
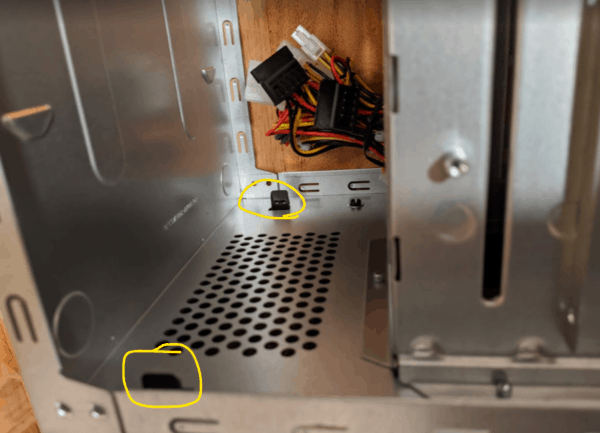
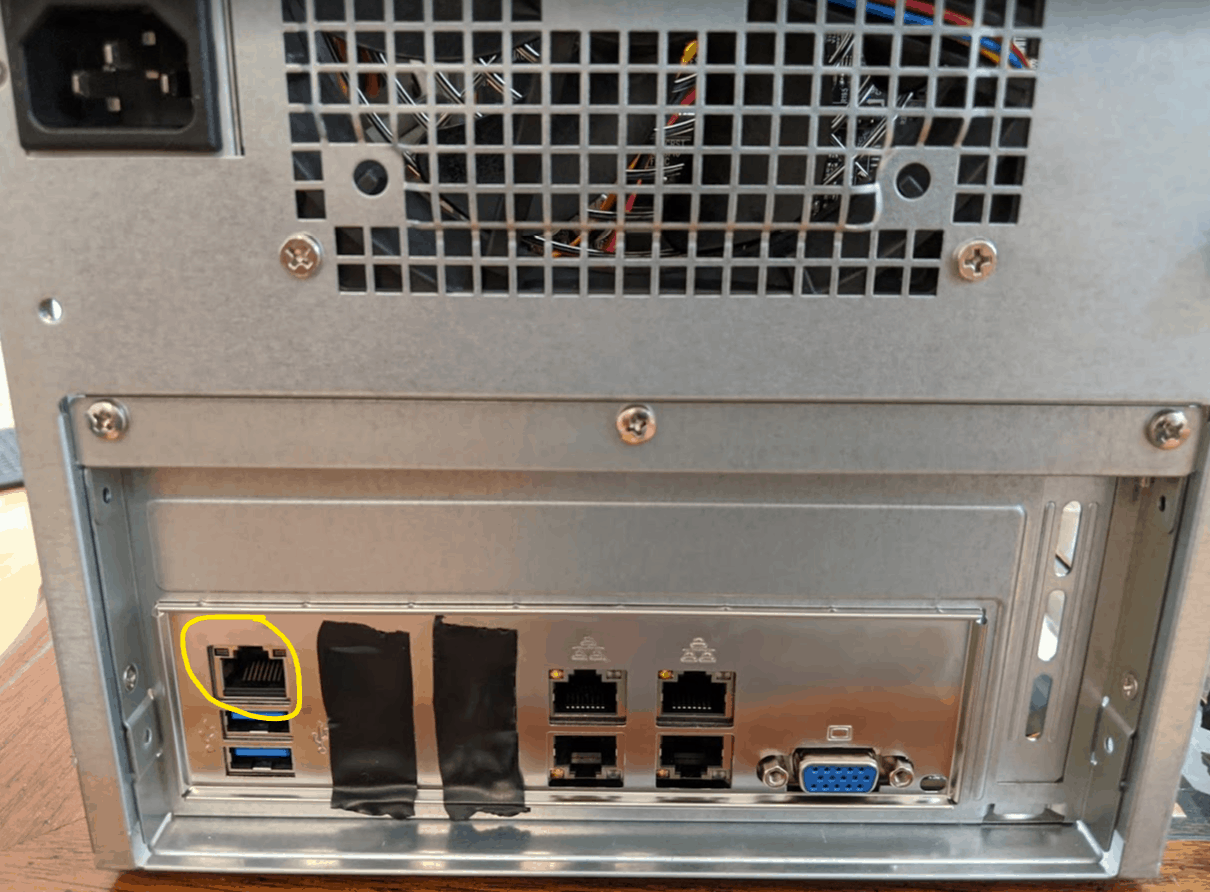
Cover any open holes in the backplate and plug Ethernet into IPMI port.
Backplate holes…. I bought this motherboard as an open box so somebody punched out all the holes… this is bad because it messes up the airflow. Cover those up with electrical tape.
Now plug in the IPMI port (circled in yellow). This is remote management. You will not need to hook up monitor, keyboard and mouse. It’s all done via Ethernet.
Plug in Ethernet, Power, and Determine IPMI IP
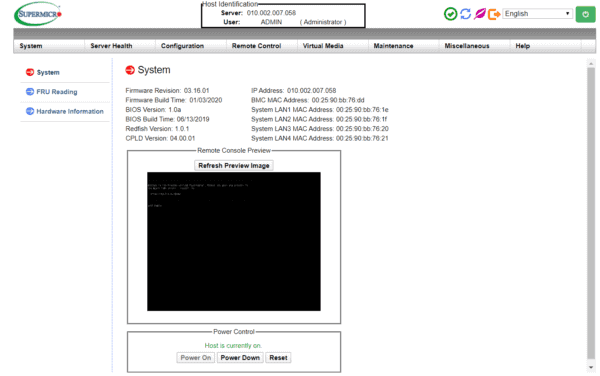
Plug in the IPMI port, then plug in power (You don’t need to power on yet, just need power to the board so the IPMI interface lights up). Check your router’s DHCP for the IP of the latest device and that should be your IPMI device. Connect to that IP. E.g. https://10.2.7.58 Default credentials are ADMIN / ADMIN (I suggest changing this).
Supermicro IPMI and KVM over IP
Here you can control your server remotely from your chair while sitting by the fire as if you were physically present. You can power it on, power it off, reset it, bring up a remote KVM, mount an ISO on your computer and boot off of it, etc.
There are 3 options for IPMI:
a. iKVM/HTML5 – You just use a browser. This is the simplest but lacks the ability to remotely mount ISOs from your computer.
b. Supermicro’s IPMIView tool (must run it as Administrator). This tool can also scan the network for Supermicro IPMI devices.
c. Use Console Redirection. This is what I usually do. This requires Java 8 LTS. I would use AdoptOpenJDK 8 or Amazon Curreto 8. You may need to associate the .jnlp file with javaws.exe.
Also, there’s a Supermicro IPMI Android App you can install to have complete control of your server from your phone. The Android app can also scan the network for Supermicro IPMI devices.
As a final note, I should mention you typically don’t install security updates to keep the out of band management interface updated. The IPMI port shouldn’t ever be public, and ideally should be on a management VLAN away from the rest of your LAN traffic.
Burn In Load Testing
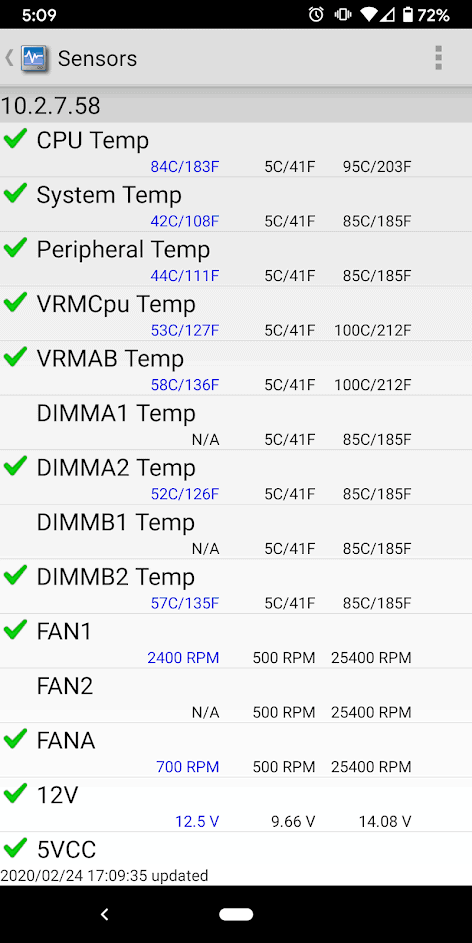
The next step is to load up something to burn in the hardware—load test it to make sure nothing fails. I like to mine for Cryptocurrency such as Gridcoin or Monero for 1 week. If there are no failures, we can consider the server ready. Make sure none of the drives fail, fan noise is tolerable at load, temperature remains okay, check the sensor logs in the IPMI interface to make sure there are no temperature alerts or ECC errors.
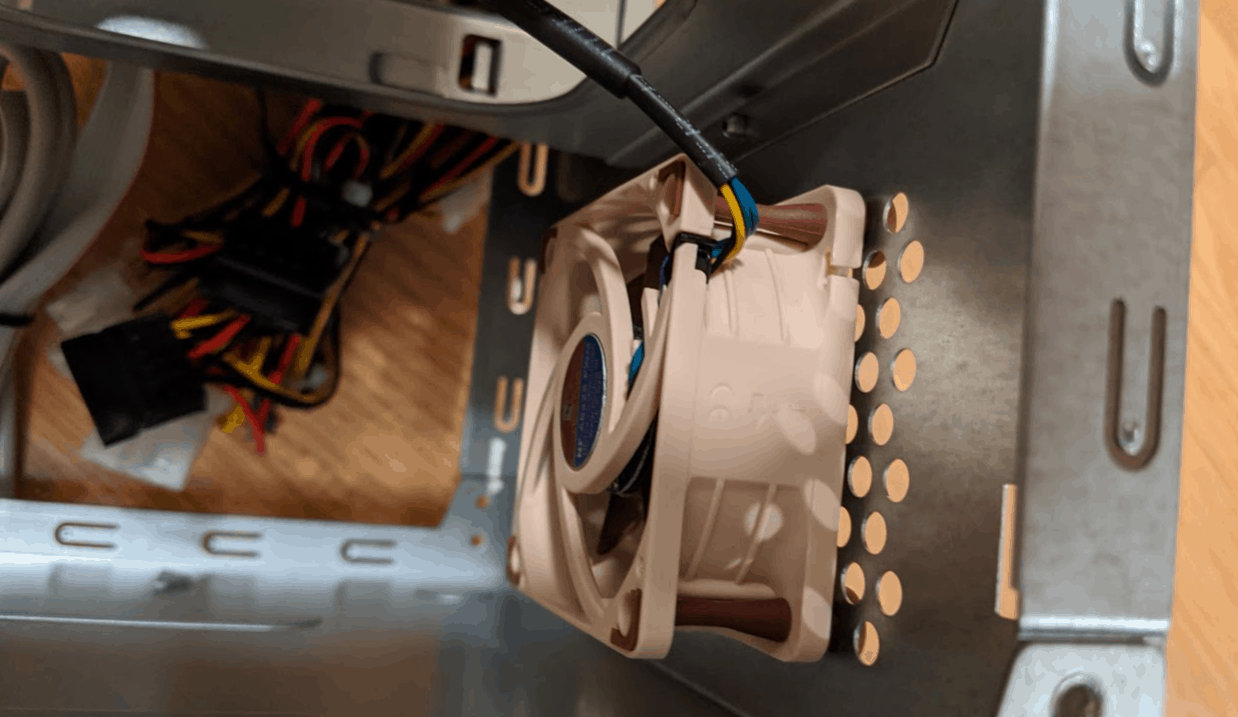
After 24 hours I checked on it and the fan noise and temperature were higher than I’d like. The CPU was at 84C, which is too hot and what’s worse is the CPU fan is running at 2400RPM making too much noise trying to keep it cool!
We must find a better cooling solution.
3D Print a Fan Mount for the M11SDV
Download a 3D printable STL file for the M11SDV 60x25mm CPU fan holder from Thingiverse and print it out. I used an Ender 3 Pro.
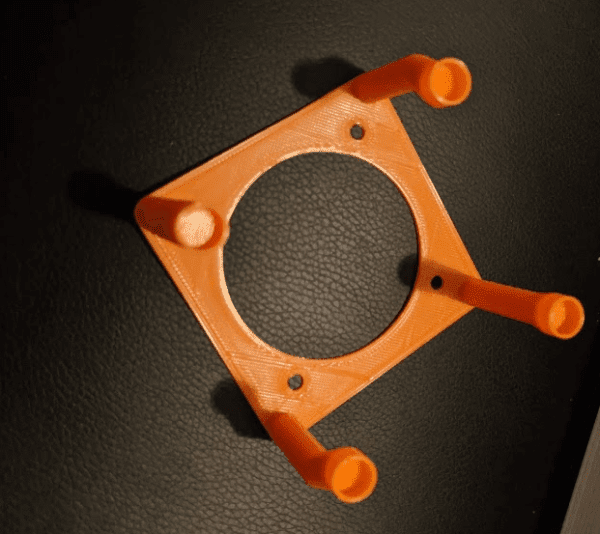
Install Noctua Fan in CPU Holder
Slide out the motherboard (wires should be long enough not to have to disconnect anything) and install the CPU holder.
I glued the legs to the screws using a hot glue gun.
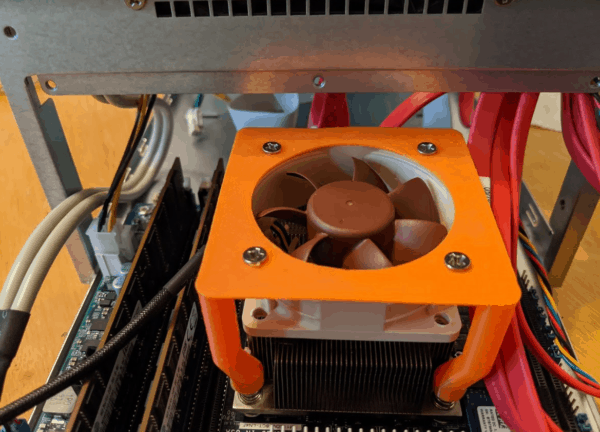
Slide the motherboard back in and power on.
Now the readings show 52C with a fan speed of 1200RPM. Much better!
The M11SDV AMD EPYC 3201 server build runs quiet… I am not using a noise reducer on the Noctua fan and I can’t hear it over the ambient noise in my office —unless I put my ear up to the case. This is the perfect server for homelabs where you’re trying to keep the noise level down but still have plenty of compute power.
To compare CPU temperature and fan speed with the Xeon-D, I have three nearly identical server builds except for the different motherboards. Just taking a quick inventory of the IPMI sensors:
- X10SDV – Xeon D-1540 8 cores – CPU 20% – 74C – 1400RPM , 3100RPM,
- X10SDV – Xeon D-1518 4 cores – CPU 50% – 78C – 1200RPM, 4900RPM
- AMD EPYC 3201 8 cores – CPU 80% – 50C – 700RPM, 1200RPM
Now to be fair, the AMD is a generation newer. However, even with the latest gen Xeon processors the AMD EPYC requires much less cooling (meaning less noise).
The AMD EPYC is now my favorite microserver CPU.
That’s the build, now I need to finish the burn-in test. Next up is a followup with a post on Proxmox.
Great build and a lot of good info. I built my last home lab off of the guide here:
https://www.techspot.com/review/1155-affordable-dual-xeon-pc/
I ended up with a different board and memory than the guide as I purcahse off of Natex.
Pg 2 shows TDP under load in the 275-315W range!!!
Intel rates the TDP of these chips at 115W each!
Epyc might be the reason i need to upgrae.
That’s a good way to save money. I was going to say the TDP was a bit high, but of course, Ben, we have the advantage of cheap hydroelectric power so as long as you don’t care about the fan noise…
I have long been a fan of AMD chips because they tend to be overall more powerful for my use cases for end-user compute. I would suggest taking a long and hard look at exactly what you’re going to be using a “Home Lab” for, and exactly how stringently things might need to adhere to explicit standards. One of the things that Intel does, that AMD does NOT do, is carry forward specific aspects and instruction sets into newer chips. So, while this chip might be powerful based on everything being leveraged for general compute, it’s quite possible that certain commercial items may not operate correctly. And, given that you’re building a virtualization host on this CPU, there could be lack of certain instructions for a number of guests.
I opted to build my home lab using a couple of HP Z800 Workstation class machines because they are built very much like a server and use Intel chips. Yes, there are cooling fans that do make some noise, but that is FAR LESS than what 1U servers generate for both heat and noise for similar compute power levels. They are available quite cost-effectively and you can stack them deep with ECC RAM and six core CPU’s if need be.
That looks like a beefy workstation Mark! Good point on instructions sets, I wasn’t aware that AMD doesn’t always carry those forward so something to keep in mind.
A little “gotcha”. The motherboard now comes with a unique password for the IPMI function ( user is still ADMIN ). The password is printed on a TINY label on top of the IPMI ethernet interface header. It took me a while to discern that what looked like a fat “U” or faded “W” was actual “IJ”. You will want that password before you put the motherboard in the case. I think there might also be a label over the innermost DIMM slot.
Just putting mine together tonight. Don’t have the 3d printer so the fan is on the front for now.
Thanks for mentioning the password Ed. I did not have to do that on mine but maybe mine was an earlier revision. Let me know how your setup goes!
Hi Benjamin:
Setup went very well. I did a second system using an Intel Atom C3758 and made that one a FreeNAS server. The 8 core Atom is a little over the top for just FreeNAS so I may use the virtualization capability as well.
I originally went with 64GB and then decided to upgrade to 96GB and put the liberated 32GB in the Atom server. I am trying to do large scale VMware NSX-T networking labs and I realized that I needed the RAM. I ended up spending quite a bit of money on the two servers, a Zyxel switch with two 2.5gbps ethernet and two SFP+ 10gbps ports on it plus a small hardware firewall appliance but I think it will prove to be well spent as regards new skills acquisition.
I certainly learned a lot about the high core count energy efficient server CPU segment.
Cheers mate!
Ed.
Thanks for the post! It inspired me to build a similar server for myself to replace my old one.
I moved four disks from my old server to my new one in the SuperChassis 721TQ-350B2 and noticed that they were in reverse order in my operating system. I made sure I connected the four SATA cables on the backplane to the matching SATA ports on my motherboard (SATA port 0 to 0, 1 to 1, etc.). It dawned on me that the backplane’s first bay was actually the bottom one, not the top one (so from top to bottom, you have disks 3, 2, 1, 0). This matches the layout of the SATA ports on the backplane. I ended up just reversing the order of my disks in the bay.
This might be an important detail for anyone moving disks that need to be in a specific order.
TIL that a “+” in the motherboard name indicates a model with a fan.
eg. https://www.supermicro.com/en/products/motherboard/M11SDV-8C-LN4F vs https://www.supermicro.com/en/products/motherboard/M11SDV-8C+-LN4F